Wednesday, November 16, 2011
Dish | Open-Face Prosciutto, Arugula, Red Onion Marmalade & Ricotta Sandwich
I just love sandwiches. When I'm older - much much older - and set in my ways, no less then 3 days a week I will still crave a turkey sandwich on dutch crunch, with bacon, avocado, red onion, provolone cheese, tomato, lettuce and just a hint of mayonnaise and cranberry mustard. I guess you could call this MY sandwich seeing as I get it so often. I got to thinking that maybe I could make this sandwich at home for once but honestly I just didn't feel like buying all of that stuff for a sandwich I get at the Whole Foods in Noe Valley for way cheaper. So... the idea of trying something new crossed my mind. This flavorful open-face sandwich comes from the December 2007 Bon Appétit. The original version didn't include arugula or olive bread, but I definitely can't take credit for the red onion marmalade... it takes the sandwich to another level. This was so quick and easy and way cheaper then spending $50 on groceries to make MY sandwich. Here's to trying new things!
OPEN-FACE PROSCIUTTO, ARUGULA, RED ONION MARMALADE & RICOTTA SANDWICH | Recipe inspire by Bon Appétit December 2007
2 tablespoons olive oil, divided
1 cup thinly sliced red onions
1/2 tablespoon golden brown sugar
1/8 cup balsamic vinegar
Pinch of dried crushed red pepper
4 1/2-inch-thick slices olive bread
4 thin slices prosciutto
Fresh ricotta cheese
1/2 cup baby arugula
1 | Heat 1 tablespoon oil in large nonstick skillet over medium high heat. Add onions and sugar. Cook until dark brown and tender, stirring frequently, about 15 minutes. Mix in vinegar and crushed pepper. Cook until mixture is thick, about 1 minute. Season marmalade generously to taste with salt and pepper.
2 | Preheat oven to 425°F. Arrange bread on baking sheet. Brush with remaining 1 tablespoon oil; sprinkle with salt. Bake until crusty, about 8 minutes.
3 | Spread ricotta cheese on each toast. Overlap 2 prosciutto slices on each toast. Top with marmalade. Garnish with baby arugula and freshly ground black pepper.
Monday, November 14, 2011
Dish | Roasted Squash Lasagna
I've been under the weather this week with an ongoing flu that has been straight-up kicking my ass. Each night I go to bed thinking, "I'm gonna feel great tomorrow!" which has definitely not been the case. After 3 days of eating the huge pot of chicken noodle soup I had made, my taste-buds (which were barely working) started craving something else. I saw this recipe on Foodess and instantly forced myself to get out of bed and take my sniffly and sick self to the grocery store. That turned out to be slightly painful as it was way too early for me to be out and about, but it paid off in the most delicious way when this bubbly and cheesy butternut squash lasagna came out of the oven. Definitely a keeper!
ROASTED SQUASH LASAGNA | Recipe inspired by Foodess
2 medium butternut squash (about 3 lbs), peeled and diced into 1/2″ cubes
3 tbsp olive oil
1 shallot, finely sliced
2 tbsp minced fresh sage leaves (or 2 tsp dried)
Salt and pepper
1/4 cup butter
1 shallot, minced
1/4 cup flour
4 cups milk
1/8 tsp ground nutmeg (or more to taste)
Salt and pepper to taste
1 box of no-boil lasagna noodles
2 cups grated mozzarella
2 cups ricotta cheese
1/2 cup grated fresh parmesan
1 | To make roasted squash: Toss first 5 ingredients together and spread on a baking sheet. Bake at 400°F for about 35 minutes, until squash is tender and browned, and shallots are caramelized. Set aside. Reduce oven temperature to 350°F.
2 | To make sauce: Melt butter in a saucepan over medium heat. Add shallot and saute 2 minutes. Add flour and whisk to combine; cook 1 minute. Slowly whisk in milk. Cook, stirring regularly, until thickened – about 5 minutes. Add nutmeg, and season well with salt and pepper. Reduce heat to low, and continue to stir occasionally as you prepare the lasagna.
3 | Spread about 3/4 cup of white sauce in the bottom of a 9×12″ baking dish. Top with lasagna noodles, then another 3/4 cup (approximately) of sauce. Sprinkle with half of the roasted squash and one-third of the mozzarella, then another layer of noodles. Top second layer of noodles with white sauce and the ricotta cheese. Add another layer of noodles, white sauce, the remaining squash, and another third of the mozzarella. Top with a final layer of noodles, white sauce, the remaining mozzarella and the parmesan cheese. Bake 30 minutes or until cheese is bubbling and golden brown.
ROASTED SQUASH LASAGNA | Recipe inspired by Foodess
2 medium butternut squash (about 3 lbs), peeled and diced into 1/2″ cubes
3 tbsp olive oil
1 shallot, finely sliced
2 tbsp minced fresh sage leaves (or 2 tsp dried)
Salt and pepper
1/4 cup butter
1 shallot, minced
1/4 cup flour
4 cups milk
1/8 tsp ground nutmeg (or more to taste)
Salt and pepper to taste
1 box of no-boil lasagna noodles
2 cups grated mozzarella
2 cups ricotta cheese
1/2 cup grated fresh parmesan
1 | To make roasted squash: Toss first 5 ingredients together and spread on a baking sheet. Bake at 400°F for about 35 minutes, until squash is tender and browned, and shallots are caramelized. Set aside. Reduce oven temperature to 350°F.
2 | To make sauce: Melt butter in a saucepan over medium heat. Add shallot and saute 2 minutes. Add flour and whisk to combine; cook 1 minute. Slowly whisk in milk. Cook, stirring regularly, until thickened – about 5 minutes. Add nutmeg, and season well with salt and pepper. Reduce heat to low, and continue to stir occasionally as you prepare the lasagna.
3 | Spread about 3/4 cup of white sauce in the bottom of a 9×12″ baking dish. Top with lasagna noodles, then another 3/4 cup (approximately) of sauce. Sprinkle with half of the roasted squash and one-third of the mozzarella, then another layer of noodles. Top second layer of noodles with white sauce and the ricotta cheese. Add another layer of noodles, white sauce, the remaining squash, and another third of the mozzarella. Top with a final layer of noodles, white sauce, the remaining mozzarella and the parmesan cheese. Bake 30 minutes or until cheese is bubbling and golden brown.
Labels:
Butternut Squash,
Dish,
Lasagna,
Mozzarella,
Parmesan,
Ricotta,
Sage
Design | Sunken Pedestrian Bridge in the Netherlands
No, your eyes are not deceiving you - the waters have indeed parted! This incredible “sunken” bridge located in the Netherlands is giving visitors a unique way to access a beautiful 17th Century Dutch fort. Designed by RO & AD Architects, the Moses Bridge literally parts the waters that surround the fort, allowing pedestrians to pass through. The bridge is made from sustainable Accsys Technologies Accoya wood, which is both FSC and PEFC certified.
A series of moats and fortresses were built over the West Brabant Water Line region of the Netherlands during the 17th century in order to provide protection from invasion by France and Spain. Fort de Roovere was surrounded with a shallow moat that was too deep to march across, and too shallow for boats. In turn the earthen fort had remained protected –until now.
From afar, the Moses Bridge is invisible to the eye. The flow of the moat appears continuous, as the water level remains at the same level, reflecting the surrounding foliage. As visitors approach the fort, the bridge appears as a break in the water with its sloping walls containing it.
First lying flush with the earth, the bridge then descends deeper into the ground. Lined with wood sheet piling for walls, the deck and stairs sit between. The bridge and its components have been made from sustainable hardwood that is Cradle to Cradle Gold certified. The Accoya wood is also treated with a nontoxic coating, protecting it from fungal decay and increasing its durability — an ideal material for a sunken bridge. Like a dam, the walls of the bridge hold the waters of the moat back, and like Moses, the bridge parts the waters so that pedestrians may pass.
The Moses Bridge gives visitors a unique opportunity to pass through parted waters, to eventually meet a historic fortress of defense.
via Inhabitat
Labels:
Architecture,
Bridge,
Design,
Netherlands,
RO AD,
Sunken
Saturday, November 12, 2011
Dish | Pear Upside-Down Cake
My best friend of 8 years - and incredible chef - Jared came to visit me for Halloween. Seeing as he lives in Seattle, we rarely get to cook together so I was (really) happy when he suggested a dinner at home. I called "dibs" on the main course and side dish while Jared took responsibility for dessert. I've said it on here before, but I'm not a skilled baker, and the idea of making a cake from scratch is somewhat intimidating so I was more then okay when Jared said he wanted to make a cake he had seen in the newest issue of Bon Appétit.
Jared and I could flip through the pages of Bon Appétit for hours. We'll even go as far as calling it our "food bible". I've basically learned how to cook from reading Bon Appétit but when he flipped to a page with the most beautiful Pear Upside-Down Cake by Karen DeMasco, my jaw nearly hit the floor. I thought, "There's no way he can make this in my sad little kitchen!" But even without an electric mixer, he proved me wrong. I have to admit that the cake I am featuring in this post is not the cake Jared made (my pictures didn't turn out well from that night), but one that I made with the confidence I got from watching him work.
PEAR UPSIDE-DOWN CAKE | Recipe inspired by Karen DeMasco/Jared You.
9 tablespoons unsalted butter, room temperature, divided, plus more
3/4 cup plus 3 tablespoons unbleached all-purpose flour
3 tablespoons coarse yellow cornmeal or polenta
1 1/2 teaspoons baking powder
1/4 teaspoon kosher salt
1 cup sugar, divided
2 medium pears (about 1 pound)
1 teaspoon vanilla extract
2 large eggs, separated
1/2 cup whole milk
Whipped cream or caramel gelato (optional)
1 | Preheat oven to 350° F. Butter pan; line bottom with a parchment-paper round. Whisk flour, cornmeal, baking powder, and salt in a small bowl. Stir 1/4 cup sugar and 2 tablespoons water in a small saucepan over medium-low heat until sugar dissolves. Increase heat to medium-high. Boil syrup without stirring, occasionally swirling pan and brushing down sides with a wet pastry brush, until sugar turns dark amber, 8-10 minutes. Remove pan from heat; add 1 tablespoon butter (caramel will bubble vigorously) and whisk until smooth. Pour caramel into prepared cake pan and swirl to coat bottom.
2 | Peel, halve, and core the pears. Place flat on a work surface and cut lengthwise into 1/8"-thick slices. Layer slices over caramel, flat side down, overlapping as needed.
3 | Mix remaining 3/4 cup sugar, 8 tablespoons butter, and vanilla in a large bowl. Using an electric mixer, beat on medium speed until light and fluffy, about 3 minutes. Add yolks one at a time, beating to blend between additions and occasionally scraping bowl. Beat in flour mixture in 3 additions, alternating with milk in 2 additions, beginning and ending with flour mixture.
4 | Using clean, dry beaters, beat egg whites on low speed in a medium bowl until frothy. Increase the speed to medium and continue to beat until whites form soft peaks. Fold about 1/4 of the whites into cake batter. Add in remaining whites; gently fold just to blend. Pour batter over pears in pan; smooth top.
5 | Bake cake, rotating pan halfway through, until top is golden brown and a tester inserted into the center comes out with a few small moist crumbs attached, about 1 hour. Let cool in pan on a wire rack for 30 minutes. Run a thin knife around inside of pan to release cake. DO AHEAD: Can be made 1 day ahead. Store airtight at room temperature. Invert cake onto a plate; remove parchment paper. Serve warm or at room temperature with whipped cream or caramel gelato, if desired.
Jared and I could flip through the pages of Bon Appétit for hours. We'll even go as far as calling it our "food bible". I've basically learned how to cook from reading Bon Appétit but when he flipped to a page with the most beautiful Pear Upside-Down Cake by Karen DeMasco, my jaw nearly hit the floor. I thought, "There's no way he can make this in my sad little kitchen!" But even without an electric mixer, he proved me wrong. I have to admit that the cake I am featuring in this post is not the cake Jared made (my pictures didn't turn out well from that night), but one that I made with the confidence I got from watching him work.
PEAR UPSIDE-DOWN CAKE | Recipe inspired by Karen DeMasco/Jared You.
9 tablespoons unsalted butter, room temperature, divided, plus more
3/4 cup plus 3 tablespoons unbleached all-purpose flour
3 tablespoons coarse yellow cornmeal or polenta
1 1/2 teaspoons baking powder
1/4 teaspoon kosher salt
1 cup sugar, divided
2 medium pears (about 1 pound)
1 teaspoon vanilla extract
2 large eggs, separated
1/2 cup whole milk
Whipped cream or caramel gelato (optional)
1 | Preheat oven to 350° F. Butter pan; line bottom with a parchment-paper round. Whisk flour, cornmeal, baking powder, and salt in a small bowl. Stir 1/4 cup sugar and 2 tablespoons water in a small saucepan over medium-low heat until sugar dissolves. Increase heat to medium-high. Boil syrup without stirring, occasionally swirling pan and brushing down sides with a wet pastry brush, until sugar turns dark amber, 8-10 minutes. Remove pan from heat; add 1 tablespoon butter (caramel will bubble vigorously) and whisk until smooth. Pour caramel into prepared cake pan and swirl to coat bottom.
2 | Peel, halve, and core the pears. Place flat on a work surface and cut lengthwise into 1/8"-thick slices. Layer slices over caramel, flat side down, overlapping as needed.
3 | Mix remaining 3/4 cup sugar, 8 tablespoons butter, and vanilla in a large bowl. Using an electric mixer, beat on medium speed until light and fluffy, about 3 minutes. Add yolks one at a time, beating to blend between additions and occasionally scraping bowl. Beat in flour mixture in 3 additions, alternating with milk in 2 additions, beginning and ending with flour mixture.
4 | Using clean, dry beaters, beat egg whites on low speed in a medium bowl until frothy. Increase the speed to medium and continue to beat until whites form soft peaks. Fold about 1/4 of the whites into cake batter. Add in remaining whites; gently fold just to blend. Pour batter over pears in pan; smooth top.
5 | Bake cake, rotating pan halfway through, until top is golden brown and a tester inserted into the center comes out with a few small moist crumbs attached, about 1 hour. Let cool in pan on a wire rack for 30 minutes. Run a thin knife around inside of pan to release cake. DO AHEAD: Can be made 1 day ahead. Store airtight at room temperature. Invert cake onto a plate; remove parchment paper. Serve warm or at room temperature with whipped cream or caramel gelato, if desired.
Friday, November 11, 2011
Design | JC Dark Lager
Tomat Design developed the name, logo and packaging design for a limited and personalized edition of beer brewed specially for an SPI Group company event with the participation of famous French wine-maker Jean Claude. This honored guest is a fan of yachting so Tomat decided to take this into consideration when developing the design.
via Lovely Package.
Labels:
Beer,
Design,
Lager,
Packaging,
Product,
Tomat Design,
Typography
Monday, November 7, 2011
Dish | Prosciutto-Wrapped Pork Loin with Roasted Apples
The recipe on the cover of Bon Appétit's recent October issue caught my attention the second I spotted it peaking out from the never ending pile of mail that sits by our door. I mean, a Prosciutto-Wrapped Pork Loin with Roasted Apples... c'mon!!! I'm pretty sure I stood at the bottom of my stairs and read the entire magazine before making my way to my apartment. How can it not catch your eye?! I don't typically enjoy many pork dishes - besides bacon - and even I couldn't keep this dish off my mind. For the past 6 weeks I have been trying to find the right time to make a meal this special. So yesterday, a random Sunday, finally felt like the perfect time to get over my fear of making a pork loin and I am so happy I did. I am confident in saying that this is one of the best things I have ever made, and minus a few minor adjustments, I owe it all to Bon Appétit!
PROSCIUTTO-WRAPPED PORK LOIN WITH ROASTED APPLES | Recipe inspired by Bon Appétit October 2011
Filling:
1 cup oyster mushrooms, chopped
3/4 cup Fuji apples, chopped
1 pound kale, bottom stems trimmed
2 teaspoons kosher salt plus more
2 tablespoons unsalted butter
1 cup minced onion
1 tablespoon finely minced garlic
1 1/2 teaspoons dried thyme
1 1/2 teaspoons dried rosemary
2 tablespoons rye bourbon
1/2 teaspoon freshly ground black pepper
1 pound ground pork
Pork:
1 (trimmed) 2 1/2–3 pound pork loin
1 teaspoon kosher salt plus more for seasoning
1/2 teaspoon freshly ground black pepper plus more for seasoning
3 ounces thinly sliced prosciutto
5 sprigs rosemary
4 medium Fuji apples, halved
3 tablespoons unsalted butter, divided
2 tablespoons extra-virgin olive oil
1 cup dry hard cider
1/2 cup low-salt chicken stock
For filling:
1 | Place mushrooms and apples in separate small bowls. Meanwhile, blanch kale in boiling salted water just until wilted, about 1 minute. Using tongs, transfer kale to a rimmed baking sheet. Refrigerate until cool. Remove any large, tough ribs.
2 | Melt butter in a large skillet over medium heat. Add onion; cook, stirring often, until soft and lightly golden, about 8 minutes. Add mushrooms and apples; cook, stirring occasionally, until flavors meld, about 5 minutes. Stir in garlic, thyme, and rosemary; cook for 1 minute. Add bourbon and cook until liquid is absorbed, about 1 minute. Stir in 2 teaspoons salt and 1/2 teaspoon pepper. Transfer mixture to a bowl and let cool completely. Add ground pork and stir to combine well.
For pork:
1 | To butterfly, put pork loin on a work surface with short end facing you. Holding a long, thin sharp knife parallel to work surface and beginning along one long side, cut 1/2" above underside of roast. Continue slicing inward, pulling back the meat with your free hand and unrolling the roast like a carpet, until the entire loin is flat. Cover with a sheet of plastic wrap. Using a meat mallet, pound to an even thickness.
2 | Uncover pork. Season with 1 teaspoon salt and 1/2 teaspoon pepper. Place kale leaves on top of loin in an even layer, overlapping as needed and leaving a 1" border. Spread filling on top of kale. Roll pork into a tight cylinder. Wrap one layer of prosciutto around roast. Tie roast securely with kitchen twine in 1" intervals. Tuck rosemary sprigs under twine, spacing apart. DO AHEAD: Pork roast can be made 1 day ahead. Cover and chill. Let stand at room temperature for 1 hour before continuing.
3 | Preheat oven to 400°F. Place apples in a roasting pan. Melt 1 tablespoon butter with oil in a large skillet. Brown pork on all sides, about 5 minutes total, then set on top of apples in pan. Add cider and 1/2 cup water to skillet and bring to a boil, scraping up browned bits. Pour mixture into roasting pan. Roast pork until an instant-read thermometer inserted into center of loin registers 140°F (it will be cooked medium but still slightly pink), about 1 hour 40 minutes. Let roast rest for at least 20 minutes and up to 2 hours.
PROSCIUTTO-WRAPPED PORK LOIN WITH ROASTED APPLES | Recipe inspired by Bon Appétit October 2011
Filling:
1 cup oyster mushrooms, chopped
3/4 cup Fuji apples, chopped
1 pound kale, bottom stems trimmed
2 teaspoons kosher salt plus more
2 tablespoons unsalted butter
1 cup minced onion
1 tablespoon finely minced garlic
1 1/2 teaspoons dried thyme
1 1/2 teaspoons dried rosemary
2 tablespoons rye bourbon
1/2 teaspoon freshly ground black pepper
1 pound ground pork
Pork:
1 (trimmed) 2 1/2–3 pound pork loin
1 teaspoon kosher salt plus more for seasoning
1/2 teaspoon freshly ground black pepper plus more for seasoning
3 ounces thinly sliced prosciutto
5 sprigs rosemary
4 medium Fuji apples, halved
3 tablespoons unsalted butter, divided
2 tablespoons extra-virgin olive oil
1 cup dry hard cider
1/2 cup low-salt chicken stock
For filling:
1 | Place mushrooms and apples in separate small bowls. Meanwhile, blanch kale in boiling salted water just until wilted, about 1 minute. Using tongs, transfer kale to a rimmed baking sheet. Refrigerate until cool. Remove any large, tough ribs.
2 | Melt butter in a large skillet over medium heat. Add onion; cook, stirring often, until soft and lightly golden, about 8 minutes. Add mushrooms and apples; cook, stirring occasionally, until flavors meld, about 5 minutes. Stir in garlic, thyme, and rosemary; cook for 1 minute. Add bourbon and cook until liquid is absorbed, about 1 minute. Stir in 2 teaspoons salt and 1/2 teaspoon pepper. Transfer mixture to a bowl and let cool completely. Add ground pork and stir to combine well.
For pork:
1 | To butterfly, put pork loin on a work surface with short end facing you. Holding a long, thin sharp knife parallel to work surface and beginning along one long side, cut 1/2" above underside of roast. Continue slicing inward, pulling back the meat with your free hand and unrolling the roast like a carpet, until the entire loin is flat. Cover with a sheet of plastic wrap. Using a meat mallet, pound to an even thickness.
2 | Uncover pork. Season with 1 teaspoon salt and 1/2 teaspoon pepper. Place kale leaves on top of loin in an even layer, overlapping as needed and leaving a 1" border. Spread filling on top of kale. Roll pork into a tight cylinder. Wrap one layer of prosciutto around roast. Tie roast securely with kitchen twine in 1" intervals. Tuck rosemary sprigs under twine, spacing apart. DO AHEAD: Pork roast can be made 1 day ahead. Cover and chill. Let stand at room temperature for 1 hour before continuing.
3 | Preheat oven to 400°F. Place apples in a roasting pan. Melt 1 tablespoon butter with oil in a large skillet. Brown pork on all sides, about 5 minutes total, then set on top of apples in pan. Add cider and 1/2 cup water to skillet and bring to a boil, scraping up browned bits. Pour mixture into roasting pan. Roast pork until an instant-read thermometer inserted into center of loin registers 140°F (it will be cooked medium but still slightly pink), about 1 hour 40 minutes. Let roast rest for at least 20 minutes and up to 2 hours.
Saturday, November 5, 2011
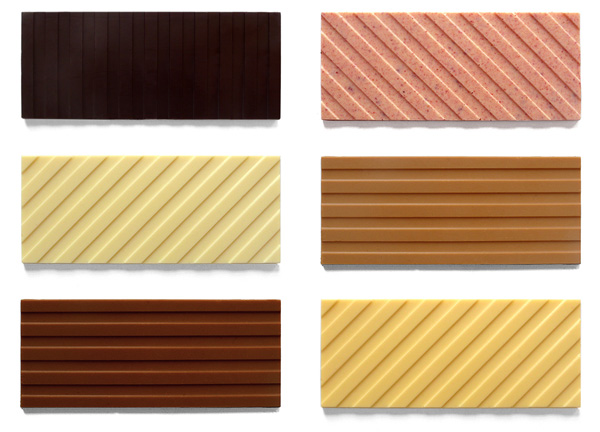
Design | Mary & Matt: Chocolate Editions
Mary Matson and Matt Even are Mary & Matt. They met in high school
and began a lifelong artistic collaboration. While studying painting,
they developed a love for design, food and the culinary arts. Mary
worked in design and pastry, Matt in advertising. Then they began to
make things they felt were missing in their life. They believe in
modernism with a smile.
Chocolate Editions by Mary & Matt is a celebration of the candy bar as a
perfect pop object. Launched in their home kitchen as gifts for friends
and family, it quickly grew into a full line that draws its inspiration
from an eclectic array of favorites -- rugby shirts, works by Sol LeWitt
and David Hockney, and Neapolitan ice cream have all been reimagined as
deliciously artful candies. Mary & Matt use the highest quality
ingredients and craft their chocolate bars in small, handmade batches.
They always have their eyes and taste buds open for new and surprising
inspirations.
Labels:
Chocolate,
Chocolate Editions,
Design,
Mary and Matt,
Product
Subscribe to:
Posts (Atom)